Pété fwèt la ! L’art de confectionner le fouet
Pété fwèt la ! L’art de confectionner le fouet
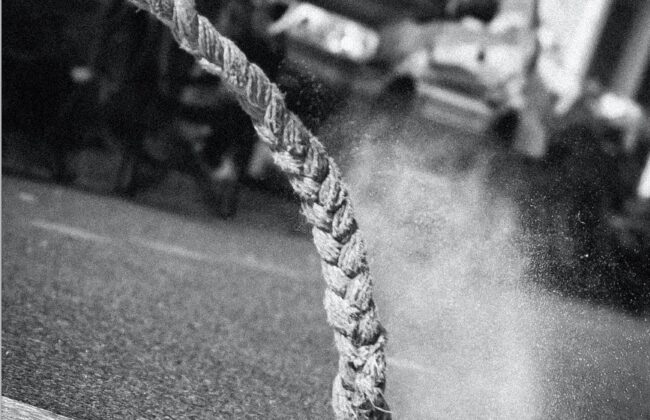
Clac ! Le son sec du fouet, le goudron lacéré, les enfants au bord des rues reculent et se réfugient sous la robe de leurs mères. Dans une scénographie magico-religieuse, les fouettards, des hommes principalement, chassent les mauvais esprits et précèdent les groupes à Po. Clac ! Le son du fouet, les cœurs qui jaillissent des poitrines. Traditionnellement confectionné à partir des feuilles du Karata, le fouet est aujourd’hui fabriqué avec une ficelle et une corde. Claude Vincenot, musicien tambour-chant et vice-président du Point D’Interrogation (groupe de carnaval des Abymes) nous enseigne l’art de fabriquer un fouet.
Par Willy Gassion
The art of making a whip
Crack! At the sharp sound of the whip, children along the side of the road step back and hide behind their mothers’ skirts. Recreating a magico-religious scene, les fouttards, the whip wielders, chase away evil spirits ahead of groups advancing to pounding calfskin drums. Crack! At that fierce concentration of power, hearts race. Traditionally made from karata leaves, whips are now made with string and rope. Claude Vincenot, a carnival drummer-singer and vice president of the Les Abymes carnival group Point D’Interrogration, explains the art of making a whip.
Matériaux : un tronçon du manche d’un balai, une corde (grosse pour les adultes, fine pour les enfants), une ficelle (c’est avec elle que le sol est fouetté) un ruban adhésif, un fil de fer, du caoutchouc.
Etape 1 : la découpe du manche à balai
Couper le tronçon du manche à balai en fonction de la morphologie de la personne qui va utiliser le fouet.
Faire une entaille à une extrémité du manche où viendra se fixer la corde.
Etape 2 : liaison corde et manche
Fixer la corde dans l’entaille avec du fil de fer qu’on enveloppe ensuite avec du caoutchouc. Maintenir le tout avec du ruban adhésif.
Etape 3 : installation de la ficelle
Fixer la ficelle sur le bout du cordage avec le fil de fer, le caoutchouc et le ruban adhésif.
Etape 4 : pété fwet la !
Voilà votre fouet est réalisé, vous pouvez maintenant l’étrenner dans les rues…
Materials: a broom handle, a length of rope (thick for adults, thin for children), a length of string (that is what actually whips the ground), wire, rubber, tape
Step 1 : Make the handle
Using a saw, cut the broom handle to a length appropriate for the person wielding the whip.
Make a notch at the sectioned end of the handle.
Step 2 : Attach the rope to the handle
Position the rope in the notch, securing with some wire, then some rubber. Wrap the junction in tape.
Step 3 : Attach the string to the rope
Attach the string to the end of the rope using wire, rubber and tape.
Step 4: Crack that whip!
Head to the street to try out your whip.